Rudolph gift tags

I don't know about you but I am having to tell the kids that no, we can’t get our decorations up yet, on a daily basis. It’s hard for them because so many of our neighbors have their lights and decorations up already. We may LIVE in America, but we are still English. And that means we can’t possibly contemplate getting a tree in November. I remember one occasion a few years ago when my eldest was about 5 and he said to me on an early December morning ‘Quick mum, let’s put our decorations up now and they’ll all think we’re American!’ Poor boy.

Anyway, even though we don’t have our decorations up we’re still starting to get into the Christmas spirit. Much of my shopping is done, our beloved wooden nutcracker dolls have been unboxed and are back in their rightful winter places safely tucked up in my kids’ bed (don’t ask) and I made a special Christmas Songs Pandora station which has been turned on more than once.

I spent some time wrapping some gifts earlier this week to send back to England and I made some gift tags for them. Do you sometimes see a craft project or tutorial that just inspires you so much that you have to give it a go almost immediately? This happens to me often, and it happened when I saw this tutorial on the Fiskars website written by designer Lisa Storms. If you scroll down a bit you’ll see her really amazing and clever way to make a little reindeer using some Fiskars punches.

I couldn’t get this little guy out of my mind.

Being on the design team, I am lucky enough to have been given a lot of Fiskars products so I was able to give this Rudolph a try. Lisa used a snowflake punch for his antlers but I used a tree punch I have. You'll have to go and read the whole tutorial to discover which punch she used for his head. Genius!

I still need to make plenty more gift tags. If you have made some you think I'll love, let me know, ok?
SHARE:

Cushions...continued

Do you remember these cushions I made a while back? Well, I finally got around to making some bigger ones that co-ordinate and sit behind the first set on my sofa. I used another print from Amy Butler's beautiful Lark collection - River Shine and put a kind of piping around the edge. I'm not sure what to call this piping stuff - it's like a twisted, coiled piping.


I find the colors in these prints completely irresistible.

SHARE:

Miniature embroidery hoops


I have a new tutorial up over at Fiskars. I know it's hard to think about Christmas with having Thanksgiving this week (US readers) but this is a sweet little craft that takes very little time and I always think that a bit of hand sewing is such a calming, pace-changing activity. You can read the full tutorial here.

Talking of Thanksgiving, I have been wondering about whether to join so many other bloggers and write a post about what I'm feeling thankful for... Part of me thinks that if I start writing, I would probably never stop. Writing the first few sentences would open a flood gate of emotion I'm not sure would ever run dry. Just thinking about this time of year literally fills my heart to overflowing, makes my hands shake and want to hold my children and husband so close that I'd never let them go.
SHARE:

Sewing for boys for girls


Last week my daughter had to go to school dressed as a scarecrow for their Scarecrow Olympics day. She didn't have anything plaid so I picked up some plaid jersey from my local discount fabric store for about $1 and quickly made up the Raglan Tee with long sleeves for her to wear with jeans and a straw hat. The Raglan Tee is such a lovely pattern and takes probably less than an hour from start to finish. I left the sleeves and hem raw and let the fabric curl naturally.


SHARE:

Thanksgiving t-shirt

I love this shirt I made for my daughter. You can find the tutorial up over on the Fiskar's website. Being a Brit living in the US, Thanksgiving is a relatively new tradition for me, but over the last 7 years of living here, I have grown very fond of taking a moment to recognize all that I have to be thankful for.

Which is plenty.

And I am thankful.
SHARE:

Ikat scarf

This scarf is one of my favorite things I have made recently. I bought the ikat in Vancouver a few weeks ago. It is handmade in India and my initial thought would be to use the fabric to make a long scarf with long tassels. I don't know much about ikat, but I was told that the cotton is dyed BEFORE it is woven, which seems so amazing to me. I don't know how they manage to come out with a pattern at the end of it. Needless to say, I quickly decided against making tassels on this scarf as I couldn't bear to undo someone's hard handiwork by pulling out the threads. So I made a big loopy scarf, following my tutorial on the Fiskar's website, only this time I didn't put a twist in the fabric. It came out perfectly.

I prewashed the fabric which worried my slightly as I really didn't want the blue to run into the pattern, but it didn't. Prewashing also really loosened up the fibers and made the fabric lovely and soft.

I used exactly 1.5 meters. I used to know how much that was until I moved to the US and started thinking in yards and inches.
SHARE:

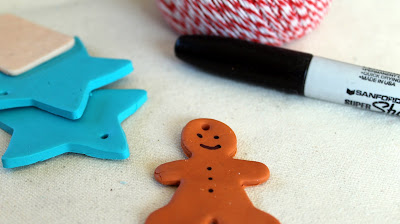
Fimo Gift tags

Sometimes I craft ideas comes to me and I have to get started immediately and that was the case with these gift tags. I already had the Fimo for a project that was never meant to be (I can't even remember what it was - beads, maybe??)

This burst of inspiration was particularly useful to me because I am not the most organized person when it comes to the holidays, and any head start I can get can only be a good thing.

These gift tags were very easy to make, though they do take a little patience to get a neat, clean shape.

First, I rolled the Fimo out flat. I used the rolling pin from my daughter's play kitchen. It was just the right size.

I used the Fiskars Tag lever punch to create a template and scored the outline of the tag shape onto the Fimo.

And I used my craft knife to cut out the shape as neatly as possible.

I made a hole at the top of the tag but piercing the Fimo with a sharp tool.

For the gingerbread man tag, I used a small cookie cutter I have to cut out the shape. At this point, my kids were getting really excited thinking we were making a tasty treat.

After baking the Fimo and allowing it to cool, I used some Fiskars Christmas stamps to decorate the tags.

I love to use baker's twine for the string of the tags because it looks so festive.

I used a Sharpie to decorate the gingerbread man.

By the time I got to the end of this craft, my kids thought that I'd make them some gingerbread men cookies, that the wrapped parcels in my top photo were for them and that Christmas was almost here. Eeeeek - this craft is not without its hazards - you have been warned!!
SHARE:

No brainer cushions {tutorial}

Oooh some lovely new cushions!

I called these 'no brainer' cushions, because seriously, they couldn't be any easier. The fabric I used is from Amy Butler's Lark collection. I am loving all ikat fabrics at the moment and I am in love with these faux ikat designs of hers, called Kasbah. I bought some real ikat on my recent trip to Vancouver (did I tell mention my trip to Vancouver????) and I think I want to make (yet another) scarf. I'm just sitting on it for a while and letting it brew. When I bought the ikat in Vancouver, the shop assistant went into great and fascinating detail about how the fabric is made and I have since done a bit more reading about it online and I think I'll have to do another fabric profile post. FYI, I feel the same way about batik. Especially since seeing these cushion from Sister Batik.

Anyway, back to my super easy cushions. I made covers for pillow forms measuring 16" x 16". I purchased 1/2 yard of each fabric - the perfect size, with very little left over.

Trim the selvage end and cut one piece measuring 17 x 17".

Now take the remaining piece of fabric. See how it is a rectangle? Trim it to 17" high, leaving the longest length intact. Fold this piece in half long-wise and cut along the fold line.

Hem the edges you just cut by folding over twice to hide the raw seams.

Place the 17 x 17" piece on your work surface, face-up. Lay the two smaller pieces face down with the raw edges matching and the hemmed seams in the center of the work. Pin and Sew around the entire square.

Clip the corners and turn the cover rights sides out. Push out the corners and press flat.

I like to finish my covers with top stitching 1/4" from the edge. This gives the cushion an outside 'lip' and helpfully encases the ugly inside seams.

I made 3 cushions in about 40 mins and that includes the time it took to pick up all the pins that fell out of my bowl when I dropped it AND a few wasted minutes dressing my thumb after I took a slice out of it with my rotary cutter.

SHARE:

Crochet Chunky Earflap hat

Obliging model

I bought this pattern last winter from The Fuzzy Noggin and made lots of lovely hats from it but during our recent trip to Vancouver, I noticed my daughter's hat was getting a little too small for her. Woohoo! An actual reason to make her a new one. Necessity.
I decided to use the same pattern because it is so lovely and also so well written. Plus, I never quite got around to adding the braids and the crochet flower last year, so this year's model looks quite different.

As recommended, I used Lion Brand Thick and Quick, in Fig and Oatmeal (sounds like breakfast...) and honestly, it took me less than 2 hours from start to finish.

I highly recommend you check out The Fuzzy Noggin if you are a crocheter or wannabe. The Chunky Earflap pattern is so well written, has multiple sizes and the finished hat has really nice details.

Not always quite so obliging...

...but will work for candy.


SHARE:

Vancouver

This blog isn't usually about anything other than my crafting life, but I do have to share a collage of photos from an amazing week we just spent in Vancouver.

The fall colors were incredible. We did many wonderful things, a few highlights being : cycling the trails of Stanley Park with the kids, kicking leaves, collecting conkers, beer tasting with the husband, the blended mojito at Earls, and eating in French cafes.

Have YOU been to Vancouver? What are your favorite things to do there? What did I miss? I need to make a list for a return journey...
SHARE:

Harvest table runner for Hancock Fabrics

A while back, I had the opportunity to create a project for Hancock Fabrics as part of their free projects available of their website. I made this table runner using some of their harvest themed fabrics as well as some contrasting linen. You can find the full tutorial pdf here.

I made the runner with a double thickness of quilt batting, so that it can be used to put hot dishes on. I figured it may as well be useful as well as pretty, while it was sitting there, on my table.


SHARE:
© The Hello Beautiful Blog | All rights reserved.
Blogger Template Created by pipdig