Halloween Fairy Costume

I have a new tutorial up over at the Fiskars website. You can find it by clicking here. This costume just kind of suits my daughter.

Here are some of the outtakes from our photo session. Luckily she's a very good sport about posing for photos for me. In fact you can probably tell she enjoys hamming it up.

Are you making Halloween costumes this year? Please share your link in the comments section.


SHARE:

It's starting to feel like Autumn....
SHARE:

French bread pizzas

French bread is my kids' favorite kind of bread. And they haven't even eaten the REAL stuff. I grew up spending the summers camping in France and even on the campsites we'd get fresh bread every morning. The boulanger would drive around in an old van (I'm picturing a Renault 4 with the baguettes sticking out of the open back window, but I'm probably just making that up) and beep to let us know he was there. Other times, it would be the kids' job to go and buy the bread from the campsite shop and it would take 3 or 4 of us to carry all the baguettes, pains and pains aux raisins we'd need for the day. Even when I was young I appreciated how luxurious it is to have fresh bread every day.

And while we are talking bread, I have to say that I am not keen on most American bread I'm afraid. I can't stand the ones that are sweetened with honey and sourdough leaves me feeling like I've been eating rocks. Large heavy rocks.

A few years ago I was chatting with a friend after we had both just come back from trips to our respective homes back in England. We had both noticed and commented to each other about how much bread and toast the English people eat and we concluded that it was probably because the bread actually tastes good.

While I'm at it, I may as well conclude by mentioning that I once told my husband in no uncertain terms (there may have been yelling) that I did not like sandwiches and he spent many subsequent weekends worrying about what to offer me for lunch if it wasn't a sandwich. I would like to revise my bold statement and surmise, for the record, that I possibly DO like sandwiches. I just don't like the bread. Probably.

Anyway, we used par-baked French bread to make our own pizzas and they were good. Yes, even the bread.


SHARE:

Graphic 45 - paper crafting

**This post was originally published in July but I am re-posting it again today to celebrate the last day of the Fiskars and Graphic 45 week of collaborative projects**

I am no scrapbooker and have to confess, not generally a papercrafter either, despite having a huge appreciation for stationary, paper products, notebooks and cards. As a student, I think I spent more time in the student union school supplies shop than I did the library. And as a teenager holidaying in France with my family, my highlight every summer was going to the supermarkets and buying stationary, pens, pencil cases and paper where everything was so much cooler than in England. (We did other great things on those holidays; boating down rivers inside caves filled with stalagmites and stalactites, sheltering from tornadoes in a caravan whilst flooding and high winds destroyed our surroundings, diving to the bottom of a lake and bringing handfuls of clay to the shore and making our own bowls....but yep, the stationary was the highlight).

So when I got the chance to try out some amazing Graphic 45 products, I was really excited but also reluctant to use them because they looked too pretty to cut, me not being an expert and all. Graphic 45 produces lovely vintage inspired scrapbook and paper crafting items like this..

The one on the left I think is my favorite (though it's hard to choose) and comes from their Once Upon a Springtime collection. The center image is from the Le Cirque collection, which of course I also love having read Water For Elephants a while ago. The one on the left is from The Magic Of Oz collection and is really fun.

The Proper Gentlemen collection has pages with golfing and car prints, and I particularly love the necktie and golf trouser prints.

So, are you wanting to know if I have taken knife to paper and made something? Why, yes I did. How could I not at least try? I had to use the fairy papers first because they were my favorite. I came up with a sweet envelope for my 5yr old.

The envelope contains 6 pull-out cards decorated with fairy images.


It's just the right size for little hands.

And has space on the reverse for her own fairy drawings.


Not to leave out my 7yr old, I made him a notebook using the On the Boulevard paper.

I found this tutorial on Japanese stab binding which completely fascinated me so I used some of Graphic 45's ribbon trim and gave it a go.

So although I'm still going to say I'm not a papercrafter, I really enjoyed using these papers to create some new things.

I have a tutorial here on how to make an envelope like the fairy one I made.

Finally, do you papercraft? Anyone have any suggestions of things I could make using all this beautiful paper I have?
SHARE:

Random behaviour

People who know me well, know that I am prone to bouts of random behavior. On Tuesdays I like my tea to be stirred clockwise, but on every other Friday I like it to be stirred in the opposite direction, but only if its raining. I sometimes wear an eye mask to bed because I don't like to be woken up by the light in the mornings. On other occasions, I have to sleep with my feet stuck out of the covers because I don't like them to be too hot but then put my slippers on to be able to walk around the house on the cold tiles.

However when it comes to desserts, for my whole life I have been completely consistent.

For as long as I can remember, this has been my top 3 dessert list :

1. Apple pie or apple crumble (either will do me, thank you very much)
2. Tiramisu
3. Profiteroles

I have made 1 and 2 over the years but never 3. Until now.

And now I know how easy Choux Pastry is to make, it is safe to say that there are plenty more profiteroles in my future and they have secured their place in my top 3 list of years to come.
SHARE:

Sewing for boys ~ Little Heartbreakers

You may have already realized with this post and this post that I am completely obsessed with the new book Sewing for Boys by Shelly Figueroa and Karen LePage. The more I make from this book, the more in-tune I am to the patterns and directions, so that creating something really amazing (like these Little Heartbreaker Pants) is very straightforward and completely satisfying.

I have made pants before without using a pattern, but the ones I have been making from this book are so much better than anything I have made myself. The cut is fantastic ~ they really suit him.

I can be a fairy haphazard sewer and can sometimes rush through a project just to get it completed. But following proper patterns from this book has really made me take pride in my work and I have really made an effort for the things I have been making to be just as great on the inside as they are on the outside.

The thing I LOVE about these trousers is the adjustable waistband using the buttonhole elastic. It all came together so simply ~ I know I would have struggled for hours and ended up in a mess had I not been using the pattern.

I love the striped fabric I used for the facing and pocket lining. It was a small scrap I had left from a yard I bought on a family trip to Singapore last year and I'm so happy I had just enough to use it.

And I love the Hong Kong finish on the pocket seams inside the trousers. Towards the back of the book there are some very helpful directions on different seam finishes.

SHARE:

National Sewing Month

I have a couple of tutorials up over at the Fiskars website I wanted to share with you. As you may know, September is National Sewing Month. You can read more about it on their website and I came up with a couple of projects I hope would inspire people to get out their machines and create.

The first is this Felt Cuff tutorial. These are really simple to make and can be endlessly personalized.


The second tutorial is for this reversible Wooden Handled Bag and though I don't like to sound like I'm bragging, I have had lots of compliments on it which always makes me smile inside.

What have you been inspired to make lately?
SHARE:

Glass marble magnets


I have some gorgeous Graphic 45 paper from their Le Cirque collection and in an attempt to use every last minuscule piece, I decided to make some fridge magnets. My kids have been back at school just over a week and already my fridge in under siege, covered with school communications, lunch menus and not to mention, artwork. These magnets I have made are not only completely useful, but they are beautiful too!

You will need

Glass marbles (you can find these in the floral section of your craft store. People put them in vases for decoration).
Magnets - again, from the craft store.
Paper
Pencil
Scissors
Mod Podge (or any glue that dries clear)
Super glue
Draw around your glass marble onto the paper you want to use for your magnet and cut it out. All my marbles were slightly different shapes so I had make sure I kept track of which paper went with which marble.

Use a fine brush to coat the flat surface of the marble. Cover the surface completely and stick the paper on. I also covered the back of the paper with glue, once it was stuck onto the marble. It gives in an extra glaze and seal.

Allow the glue to dry. It WILL dry clear.


Once dry, stick the magnet onto the back of the paper. I used some kind of super glue I found at the bottom of my sewing box where all the weird and wonderful things are. Make sure you use this in a well ventilated space.

And that's all there is to it! I ended up with a lovely new set of fridge magnets.

Oh, and did you happen to notice my Halloween magnets too? I couldn't just stop at one set, could I? I also used some of the Fiskars Seasonal Punches which were given to me a short time ago.

They were made in the same way as the Graphic45 set.

I drew around the shape of the marble and cut it out. Then I used the various seasonal punches to punch shapes and stuck these shapes onto the paper.

I then continued in the same way, and spread Mod Podge onto the flat surface of the marble (you can also use a toothpick instead of a brush).

After allowing it to dry, I used the superglue to stick on the magnet.

What ways do you find to use up tiny scraps you can't bear to waste? I'd love to hear your ideas. I am in possession of a few more scraps.


SHARE:

Chocolate crunch

Something my 5 yr old and I love to do together is cook and bake in the kitchen and although this recipe doesn't involve actually putting something into the oven, it is a recipe she can really get stuck into, so to speak.

First we broke 6oz of milk chocolate and 6oz of dark chocolate into pieces and melted them on the stove over a pan of boiling water.

As it was cooling in the pan, we broke a packet of graham crackers into pieces. One of us nibbled quite a few pieces as we went along.

Then we chopped up some white chocolate into small pieces which we added, along with the graham crackers, to the saucepan of melted chocolate. We gave it a good stir.

Finally, we poured it into a greased loaf tin lined with parchment paper, and put it into the fridge for a couple of hours.

Once it was set hard, I got a big knife and chopped it into bite sized pieces and stored it in a box in the fridge. It didn't last long.


SHARE:

Sewing for boys ~ Treasure Pocket Pants

My second project for my 7 yr old from the new book Sewing for boys is this pair of Treasure Pocket Pants. I like to call them trousers, because pants to me is underwear, but let's not worry about that for now.

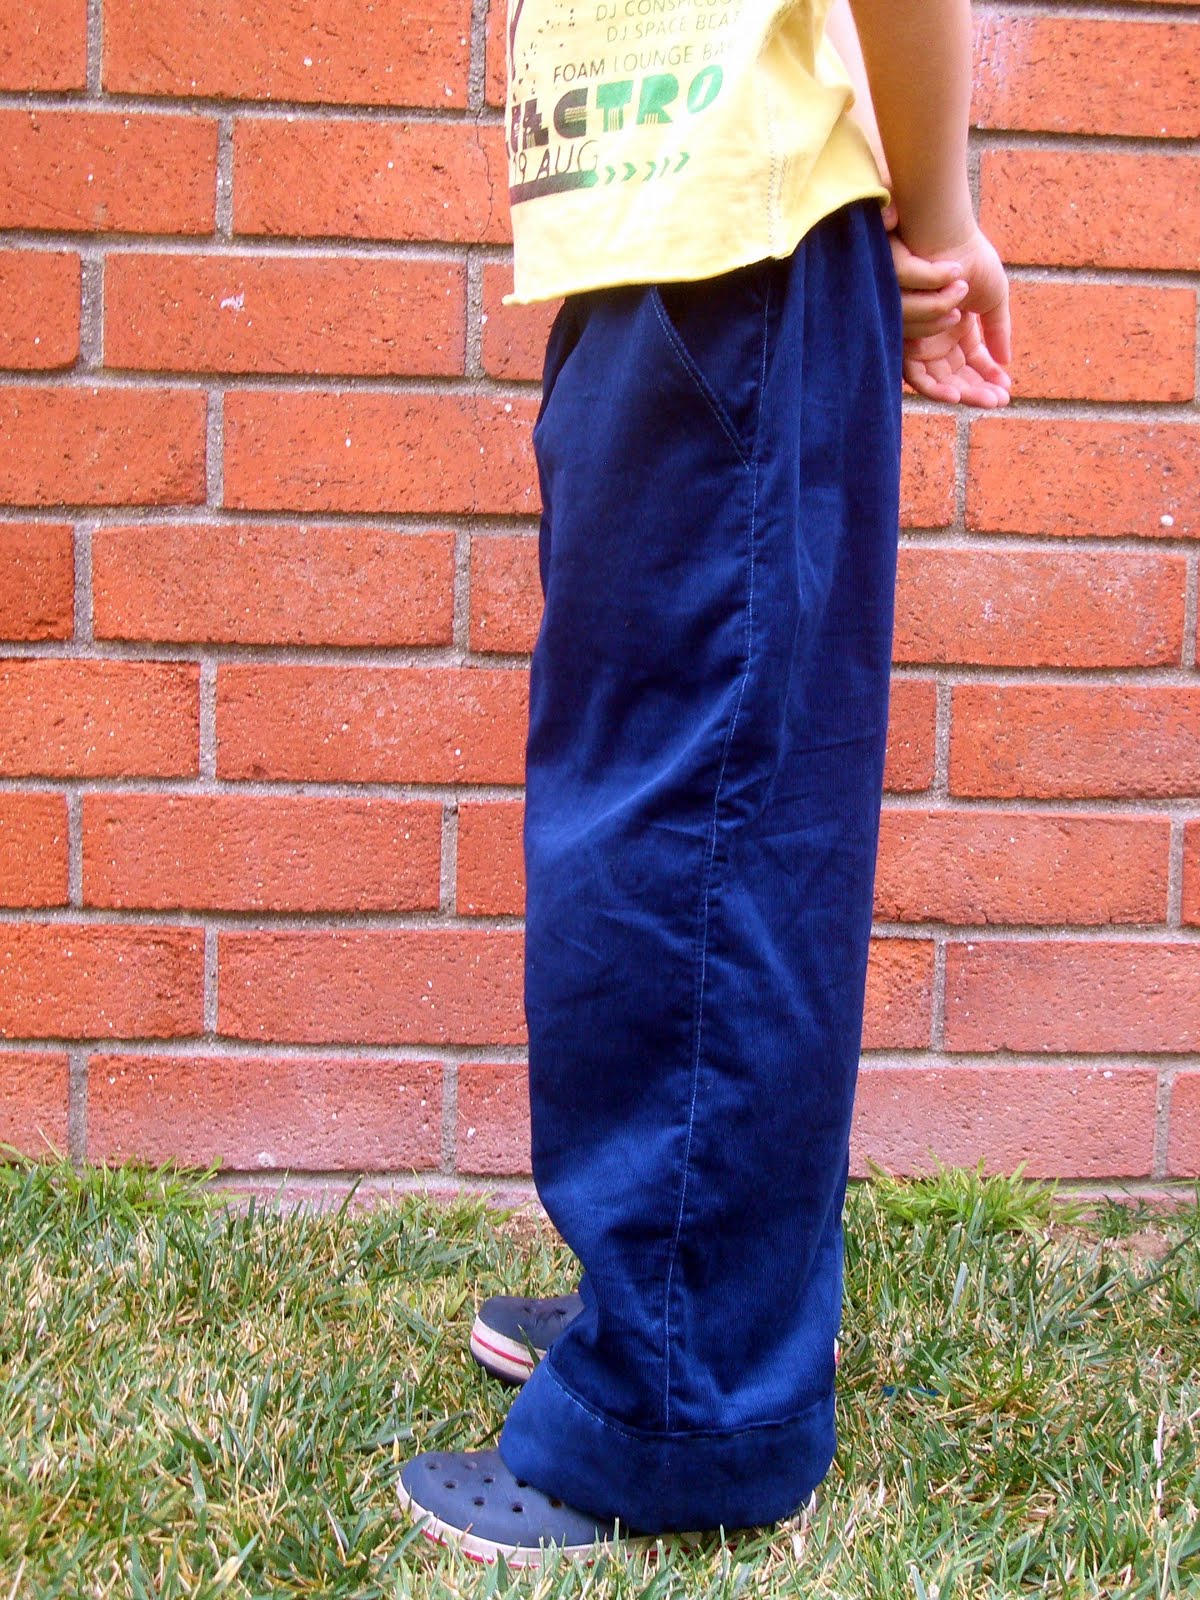
I used a lightweight denim and actually used the back of the fabric as my right side. I loved its washed out, faded look. I can't remember who the print is by.

And yes, you can climb trees in them.

I changed the waistband on my trousers. The one in the book, whilst cute, I think would be better suited to a smaller boy who might tuck tops in more often that my 7yr old. I made a 1" casing for my elastic and kept it simple.

The side pockets are such a nice detail. In the book and pattern directions it tells you to use the contrast fabric for the side panel top, but in the photos of their finished item, they used the main fabric for the side panel top. I think I would have preferred to use the denim and though I didn't care enough to go back and re-cut it, it's mildly annoying to me that the directions don't match the photos. Or did I just make all that up in my head? Other people seem to have done it in the same way as the photos....

As well as the great side pockets, I also love how they recommend finishing the back center seam with a Turn and Stitch seam finish. It looks so professional and expertly finished and although it's on the inside, just knowing it's there makes me happy.

Another detail I love is the hem facing on the bottom of the trouser legs.

The directions were very straightforward and the trousers themselves are simple to put together. The pattern does have a couple of computer-drawn diagrams which are so overly simplified I don't actually see the benefit of having included them. I would have preferred a photo if anything, but that's probably me just being weird.

Anyway, the trousers are lovely and I can't say enough about how much my son is enjoying them. The cut really suits him (I was unsure about how they would look on an older child compared to the little one modelling them in the book) and they are definitely comfortable (he asked if he could wear them to bed).

And I'm not stopping there! I am currently making the Little Heartbreaker Pants in navy blue corduroy and though the Luka Hoodie is calling out to me to make it, I need to find just the right fabric for it before I start. Do let me know if you make something from the book ~ I'd love to see it. There is also a flickr group for the book ~ I'm sure the authors would love to see your hard work.
SHARE:
© The Hello Beautiful Blog | All rights reserved.
Blogger Template Created by pipdig